
Above is a work in progress that I think will give the map more color and verbosity. Also navigation tools utilizing graph theory and graph SW are put into play. More details to follow.
*****************************************************************************
How I Solved the SOMAP by Merv Eberhardt of Huntsville, Alabama.
This entire effort was based on reverse engineering of the seven SOMA
pieces to achieve the designated SOMAP cube codes as discussed in the SOMA
Newsletter, 18May2003.
http://www.fam-bundgaard.dk/SOMA/NEWS/N030518.HTM
http://www.fam-bundgaard.dk/SOMA/NEWS/N030518.HTM
The key concepts are, DEFICIENCY, CENTER, and DEXTERITY. The
designation of the pieces is based on the piece colors:
1=B (Brown)2=Y (Yellow)
3=G (Green)
4=O (Orange)
5=U (blUe)
6=R (Red)
7=A (blAck).
The orientations of pieces 1, 2, and 4 determine the
dexterity values.
1 = a small capital "L"
2 = a large capital "L"
4 = a "Z"
Dexterities 0-7:
Dexter = Looks like a letter L or Z.
Sinister = looks like a backward letter L or Z.
Orientation is based on the orientation on the edge.
Dexterity Piece
Number Number
1 2 4
Number Number
1 2 4
0 0 0 0
1 1 0 0
2 0 2 0
3 1 2 0
4 0 0 4
5 1 0 4
6 0 2 4
7 1 2 4
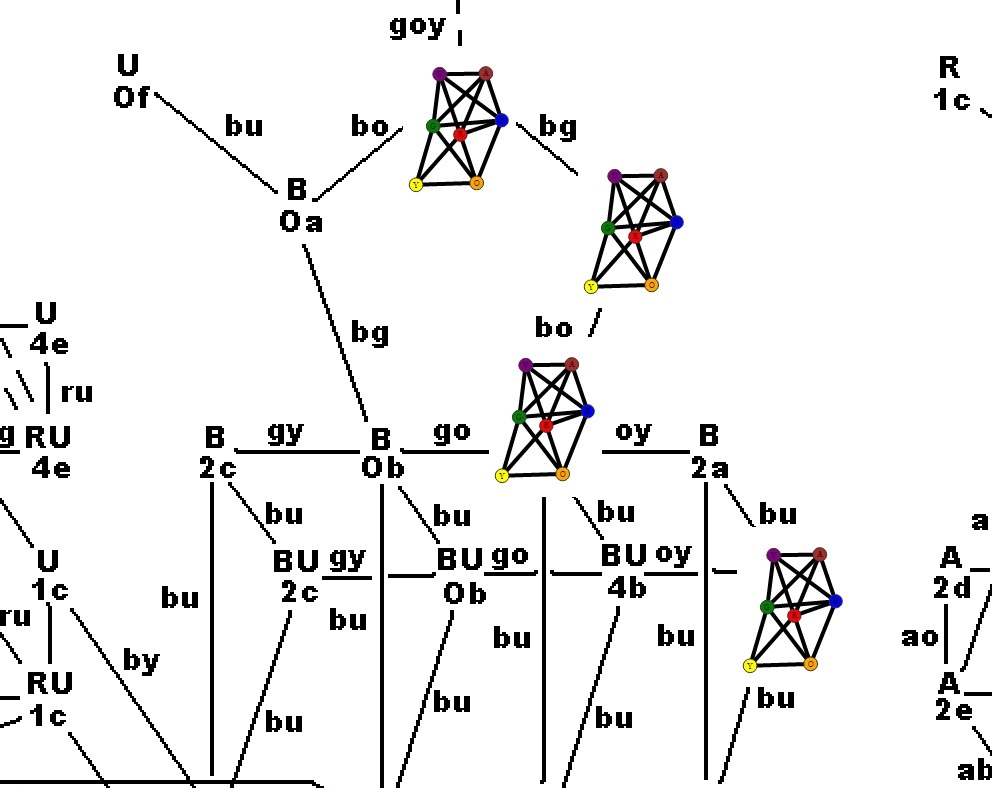
My attention was drawn to the 14 gy-go-oy transitions in the middle of
the SOMAP and I started at the bottom mid-right. My initial goal was to
identify the solutions to the RU2-RU0-RU4-RU2 transitions. Those
transitions are also applicable to the other gy-go-oy transitions at U2-U0-U4-U2;
BU2-BU0-BU4-BU2; B2-B0-B4-B2; R2-R0-R4-R2; BR2-BR0-BR4-BR2; A2-A0-A4-A2; and
A3-A1-A5-A3.
(Notes from EdV:
1. Lower case letters on edges are the colors of the pieces that get swapped. red, orange, yellow, green, blue, brown, black.
2. Lower case letters in a node indicate which solution iteration of the Deficient, Center and Dexter properties.
3. Capital letters are Deficient piece and Center piece in that order if there is only one capital letter this indicates that the piece is both the Deficient piece and the Center piece.
For instance RU4e means:
a. R (Red)is Deficient. It does not contribute any of its cubes to any of the eight vertices of the cube solution.
b. U (blUe) is Center. One of its cubes occupies the center cube of the cube solution.
c. 4 is the Dexter property. Piece 4 which is the "Z" shaped orange piece must when viewed as "sitting on the edge" it occupies with two cubes it will appear as a proper letter "Z". (I hope that is right because it really is not simple to interpret)
d. e is the "e"th or fifth cube solution for the RU4 series of Deficient, Center and Dexter properties.)
Bottom Layer Bottom Layer
(Notes from EdV:
1. Lower case letters on edges are the colors of the pieces that get swapped. red, orange, yellow, green, blue, brown, black.
2. Lower case letters in a node indicate which solution iteration of the Deficient, Center and Dexter properties.
3. Capital letters are Deficient piece and Center piece in that order if there is only one capital letter this indicates that the piece is both the Deficient piece and the Center piece.
For instance RU4e means:
a. R (Red)is Deficient. It does not contribute any of its cubes to any of the eight vertices of the cube solution.
b. U (blUe) is Center. One of its cubes occupies the center cube of the cube solution.
c. 4 is the Dexter property. Piece 4 which is the "Z" shaped orange piece must when viewed as "sitting on the edge" it occupies with two cubes it will appear as a proper letter "Z". (I hope that is right because it really is not simple to interpret)
d. e is the "e"th or fifth cube solution for the RU4 series of Deficient, Center and Dexter properties.)
Back to Merv:
Starting with the <oy> transition between RU4a and RU2a, RU4a<oy>RU2a.
I recognized that the RU2a layout required a dexterity of 2 to be satisfied with the (Y)ellow piece
and that the RU4a layout would require a dexterity of 4 to be satisfied with the (O)range piece.
I determined that the following layouts on the bottom layer would provide the proper transition and dexterity values.
Bottom Layer Bottom Layer
RU4a RU2a
Y Y Y Y Y O
Y O O<oy>Y O O
O O x Y O x
The next consideration was the <go> transition RU0a and RU4a, RU0a<go>RU4a. The (G)reen piece would not affect the dexterity value while the (Y)ellow piece would change its dexterity value from 4 to 0. It was somewhat obvious that one of the ends of the Green piece would occupy the remaining space in the bottom layer and run vertically along the right-front edge; but what should be its orientation in the middle and top layers with respect to the <go> transition? And how would this be represented in the first two layouts, i.e. RU4a and RU2a?
This lead to the following:
T x x x x x x x x x
O x x x x x x x x x
P x x O x x G x x G
RU0a RU4a RU2a
I x x O<go>x x G<oy>x x G
D x x O x x G x x G
B Y Y Y Y Y Y Y Y O
O Y G O Y O O Y O O
T G G G O O G Y O G
The <gy> transition RU2b and RU0a was straightforward.
The Y and G pieces would exchange positions in an obvious way such that would change the dexterity value of the Yellow piece from 0 to 2.
T x x x x x x x x x x x x
O x x x x x x x x x x x x
P x x O x x O x x G x x G
RU2b RU0a RU4a RU2a
M x x x x x x x x x x x x
I x x O<gy>x x O<go>x x G<oy>x x G
D x x O x x O x x G x x G
B G G G Y Y Y Y Y Y Y Y O
O Y G O Y G O Y O O Y O O
T Y Y Y G G G O O G Y O G
So far, three pieces, G-O-Y, have been arranged into the bottom, middle, and top layers.
The O piece has been placed so that its dexterity value of 4 was properly considered.
The Y piece has been placed so that its dexterity value of 2 was properly considered.
The four corners in the bottom layer and one corner in the top layer have been placed.
To complete the layouts, the orientation of the remaining four pieces, i.e. A, B, R, and U, must be determined.
The following criteria must be met: piece R must be deficient,
that is it must not occupy any of the remaining three cube corners.
Pieces B, U, and Y must occupy the remaining three cube corners.
Piece 1=B must be in a sinister position so as not to add to the dexterity values.
And finally, piece U must occupy the space in the center of the cube.
The resulting layouts are as follows:
T A A B A A B A A B A A B
O A R R A R R A R R A R R
P U R O U R O U R G U R G
RU2b RU0a RU4a RU2a
M A B B A B B A B B A B B
I U U O<gy>U U O<go>U U G<oy>U U G
D U R O U R O U R G U R G
B G G G Y Y Y Y Y Y Y Y O
O Y G O Y G O Y O O Y O O
T Y Y Y G G G O O G Y O G
With the identification of these three swaps between the four layouts, all of the remaining SOMAP cube codes can be revealed from the specified two and three piece swaps and cube codes throughout the SOMAP.
I would like to point out several challenges
appear elsewhere on the SOMAP.
They consist of 23 three-way patterns that consist of swaps between
<ab>, <br>, <bu>, and <roy>.
And a swap <guy> between four solutions.
These must take into account differences between the three variables of
cube codes, i.e. deficiency, center, and dexterity. A true test of
SOMAPmanship. Good luck. Let me know of your success.
*****************************************************************
Here is the Somap enhancement I am considering:
Compact sub-graphs for each cube solution consisting of:
1. Nodes that will contain
a. Color of the piece
b. EVFC (Edge, Vertex, Face, Center) properties of the piece
c. A node position that is indicative of where its first cube resides in the 1-27 cubes of the solution
2. Edges are numbered to indicate the number of shared cube faces touching.
Sort of a "Friends Graph" of the pieces in a particular solution. To make the drawing of the compact graph doable and fun (I hope) I am using Edgy (a graph manipulation SW implemented in SNAP):
http://snapapps.github.io/edgy/app/edgy.html
It starts with an input cube grid graph shown below (after coloring it in of course to match a solution found using a set of properly colored cubes)
the Edgy program sorts through the colors and tallies up the edges and node EVFC properties and draws the compact sub-graph which is then copy pasted into the SOMAP.
I will be maintaining a repository of my Edgy work here:
https://github.com/EdV2/Soma-Cube-Solution-Grapher


